
A Christmas window box has a harder job than an indoor arrangement: it needs to look good from the sidewalk while coping with rain, wind, and changing temperatures. The answer is not to move every pretty indoor ornament outside. Start with a sturdy box, a limited palette, and materials suited to its exposure.
These ten Christmas window box ideas show real outdoor boxes beneath windows—not porch pots standing in for them. Each combines a clear visual idea with a practical way to adapt it. Photographs show the composition; they do not certify the decorations, mounting, or electrical equipment for your home.
Check the box before adding the greenery
The support: Inspect the box, liner, brackets, fasteners, and wall attachment before decorating. Follow the box and bracket manufacturers’ installation and load instructions, accounting for wet growing medium, decorations, and local snow or ice. There is no universal safe weight for every window box. Illinois Extension advises securing hanging containers and considering dripping and safety below. Keep windows operable and vents clear. Have difficult, high-level, or uncertain installations assessed professionally; do not lean out of a window to arrange them.
Keep drainage open through winter
The base: Use a container and liner suitable for your local freezing conditions, and follow any model-specific reservoir or winter-storage instructions. Keep drainage outlets clear of packed foliage and debris. Illinois Extension explains that drainage holes matter and a gravel layer does not improve drainage inside an individual container. Where the box allows a soil-filled display, insert cut ends firmly into the potting mix while it is unfrozen; add a suitable secured stem grid if needed without blocking drainage. This retains stems, not the box itself: it does not replace the building attachment. Do not block drains to create a frozen block of water.
Separate cut arrangements from living plantings
The materials: Most examples below are seasonal cut-branch displays, not plants that will establish roots. Check them during mild spells and replace browned, brittle, or storm-damaged pieces. University of Minnesota Extension notes that warm spells change winter arrangements’ moisture needs and wet snow or rain can wash flocking away. Do not promise artificial snow, felt, velvet flowers, or indoor clay crafts an outdoor season. Use nursery-supplied cuts or permitted clippings, and treat all berries and foliage as decoration, not food.
Choose outdoor finishes—and check every electrical component
The exposure: Use decorations and ribbon explicitly intended for the actual outdoor conditions; “under the eaves” is not the same as dry. Secure individual pieces against wind and inspect after storms. For lights, CPSC recommends outdoor-certified sets, sound outdoor-use cords, and GFCI protection for outdoor plug-in lighting. UL distinguishes indoor-only from indoor/outdoor light strings. The timer, adapter, connectors, and battery box must also be rated for their actual outdoor exposure; follow their rain, snow, and temperature instructions. LED, solar, or battery power alone does not establish suitability. Do not pierce wiring with fasteners or pinch a cord in a closed window; choose an unlit display if you cannot power it appropriately.
1. Red Berry Sprays + Two-Tone Evergreen Layers
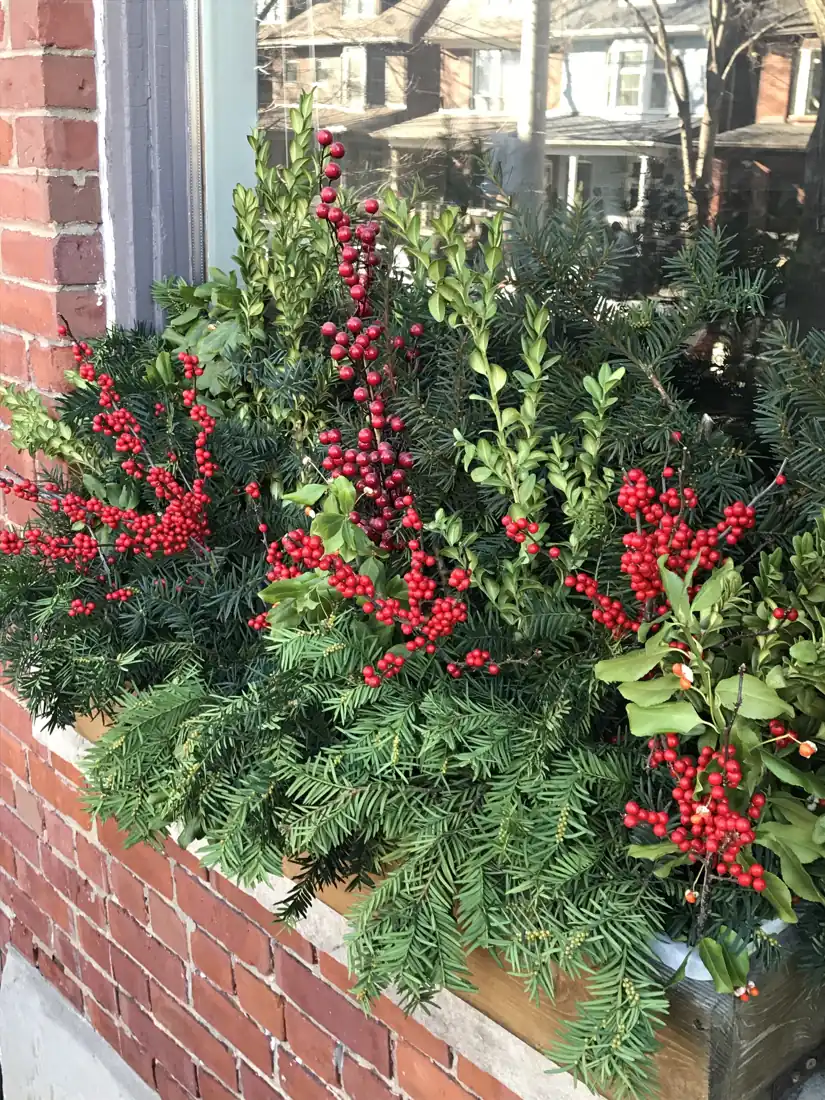
This brick-wall window box gets its festive color from red berry sprays rather than a collection of ornaments. Darker greenery forms the back, while lighter, softer branches spread across the front. The upright red accents stay readable against both layers.
Arrange it: Build a low, outward-facing base first, then add the taller berry sprays between the background branches. The original maker mixes fresh berry branches with a faux red spray, so the photograph should not be read as a single plant species. If using artificial stems, select outdoor-rated ones and secure them to the internal support rather than simply balancing them on top.
Budget and weather: Spend on a few visible accents, not enough berries to fill every gap. Keep the profile lower on a windy elevation, inspect for loose berries or ties, and refresh damaged cuts. A dense look is not a reason to overload the box or conceal its drains.
2. Silver Cuttings + a Matching Wreath and Red Bow
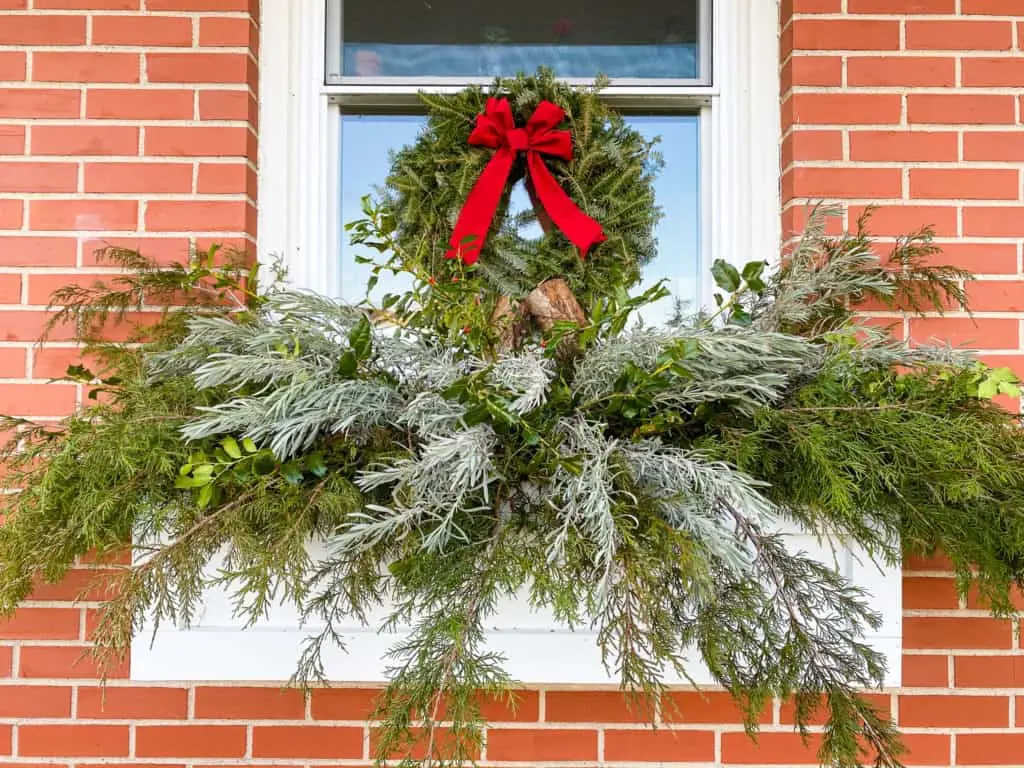
Fearless DIY combines green branches with a broad silver layer across a white box. A wreath and red bow above it make the window feel like one coordinated display. The original project identifies fresh cedar and cut lavender; the silver is not evidence of frost-tolerant living plants.
Get the balance: Place longer green pieces at the sides and front, then repeat the silver cuttings across the middle rather than concentrating them in one tight bunch. Keep the wreath separate from the box, with its own appropriate fixing. You can borrow the color combination without copying the original’s log accents or their extra load.
Weather note: This loose, fine-textured arrangement needs checking after wind and wet snow; trim or replace broken and browned stems. Use an outdoor-suitable bow with manageable tails. For a small box, reduce the spread of the branches rather than buying a larger wreath to fill the view.
3. Long Pine Needles + Glossy Leaves and Pinecones
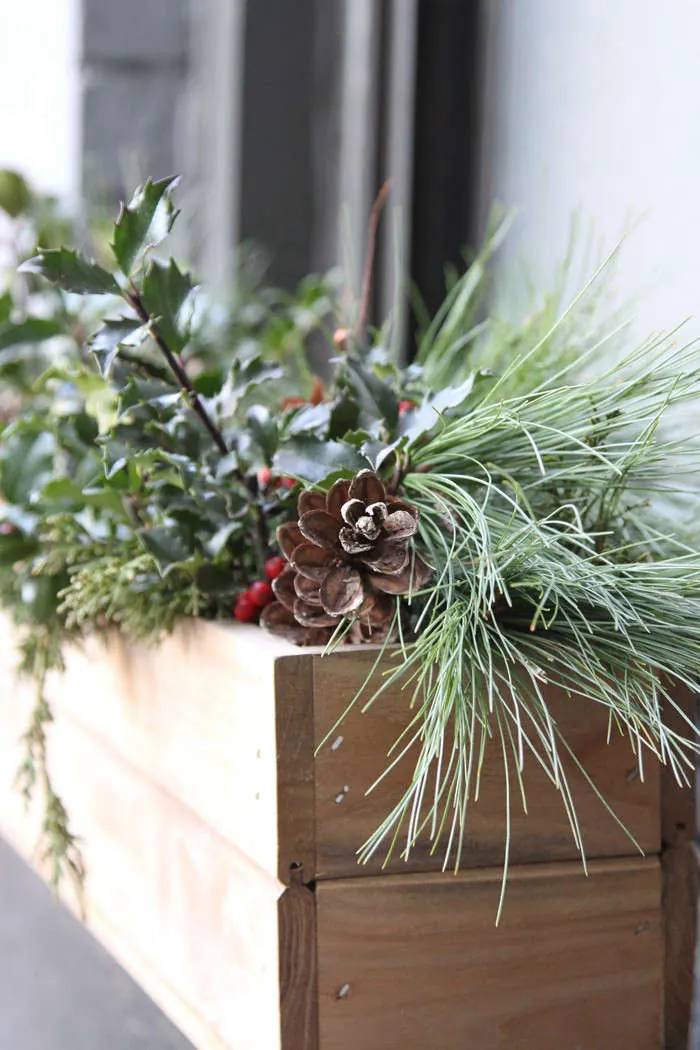
Erin Boyle’s urban window box keeps the palette almost entirely green and brown. Long needles fall beyond the wooden rim, while glossy leaves add a different shape and a pinecone breaks up the texture. It is a quiet Christmas look that does not rely on lighting.
Small-space formula: Use longer cut greenery as the lower layer, shorter leafy cuts toward the back, and a few attached cones near the front. The original article documents the maker’s own cut-branch arrangement; it is not a recommendation to plant all these materials together. Keep the display below the part of the window you need to open.
Make it practical: Use a few legally obtained clippings or tree-lot offcuts rather than buying an entire garland. Secure cones instead of leaving them loose on a sill, and shorten projecting pieces on exposed windows. Check the unfrozen base during mild, drying weather without trapping standing water in the liner.
4. Red Twig Bundles + a Circular Light Frame
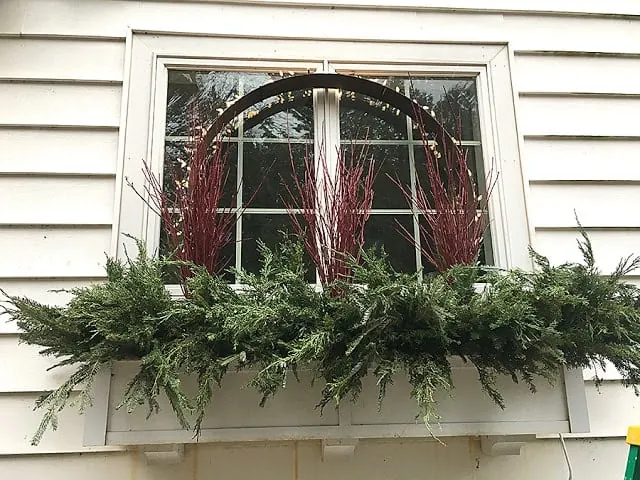
Erin’s white window box uses upright red twigs to bring height behind a lower layer of cut greenery. The circular frame sits in the center of the window, leaving the arrangement’s outline clear even when its lights are off. This is a whole composition, not just a string of lights dropped onto branches.
Arrange it: Start with an appropriately sized, outdoor-rated light form and a support system suitable for the box and location. Group the cut twigs in small bundles on either side, then fill the lower edge with greens. Follow the original for visual inspiration, not as proof that a homemade electrical assembly or a particular support is suitable for your house.
Wind and scale: Tall twigs and rings catch wind, so reduce their height or omit the ring where a suitable fixing cannot be provided. Do not block an opening window. Reuse the same rated light form next year if inspection and the manufacturer’s instructions allow; no new color scheme is required.
5. Natural Wood + a Front Edge of Pinecones
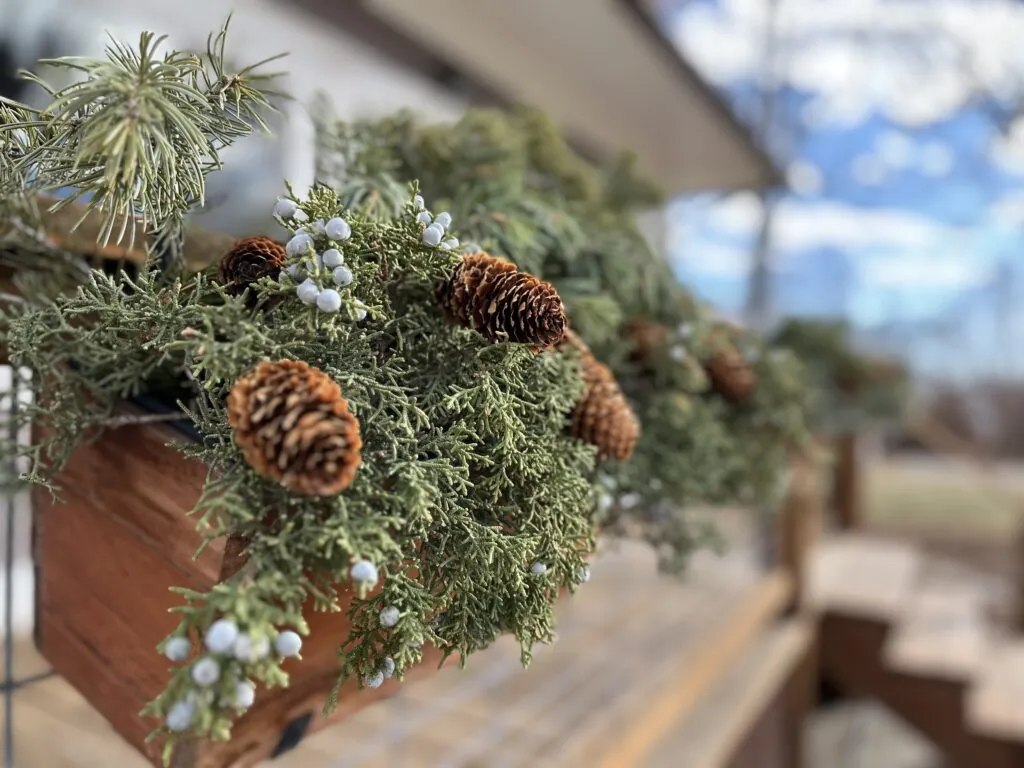
Beth’s wooden window boxes let the texture do the decorating: fine greenery, pale blue-gray clusters, and brown cones make a soft woodland palette. The close view shows the box continuing along the wall beneath the windows, rather than a separate pot on a porch.
Build the line: Arrange cut greenery along the length, then repeat cone accents at intervals near the front so they remain visible from below. The creator describes collected branches and cones, but you do not need to identify a plant from the photograph to reproduce the general texture. Choose available cut greenery, not an assumed species with unverified winter-care requirements.
Budget note: This works without ribbon, glass ornaments, or electrical supplies. Attach the cones and keep their projections modest where wind or people passing below are concerns. Rain and snow still require clear drainage; replace tired cuts instead of adding artificial flocking and assuming it will stay put.
6. Magnolia Leaves + Tartan Ribbon and Bells
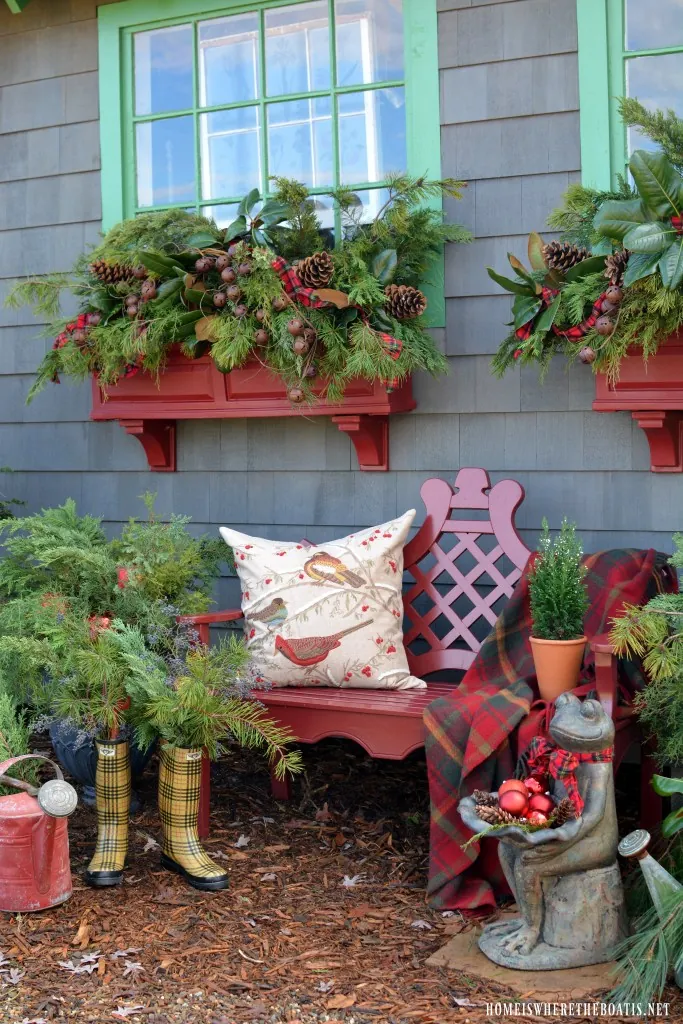
Mary’s potting-shed boxes combine mixed greens, broad magnolia leaves, pinecones, tartan ribbon, and a little bell garland. The green window frames make the red checks stand out, while the ribbon links the separate boxes into one coordinated facade.
Copy the rhythm: Lay in the cut-green base, place the larger leaves where their broad shapes will show, and repeat restrained ribbon loops across the front. Mary identifies cedar, cypress, pine, and magnolia in her original arrangement; these are cut materials, not a claim that all four can be grown in any window box. Secure ribbon and garland independently of the foliage.
Rain and budget: Use suitable outdoor ribbon and inspect metal bells for loose parts and staining against pale paint or masonry. Remove a soaked or deteriorating bow rather than leaving it pressed against the wall. One roll repeated across the windows can look more intentional than a different accessory in each box.
7. Oversized Red Ornaments + a Warm-White Glow
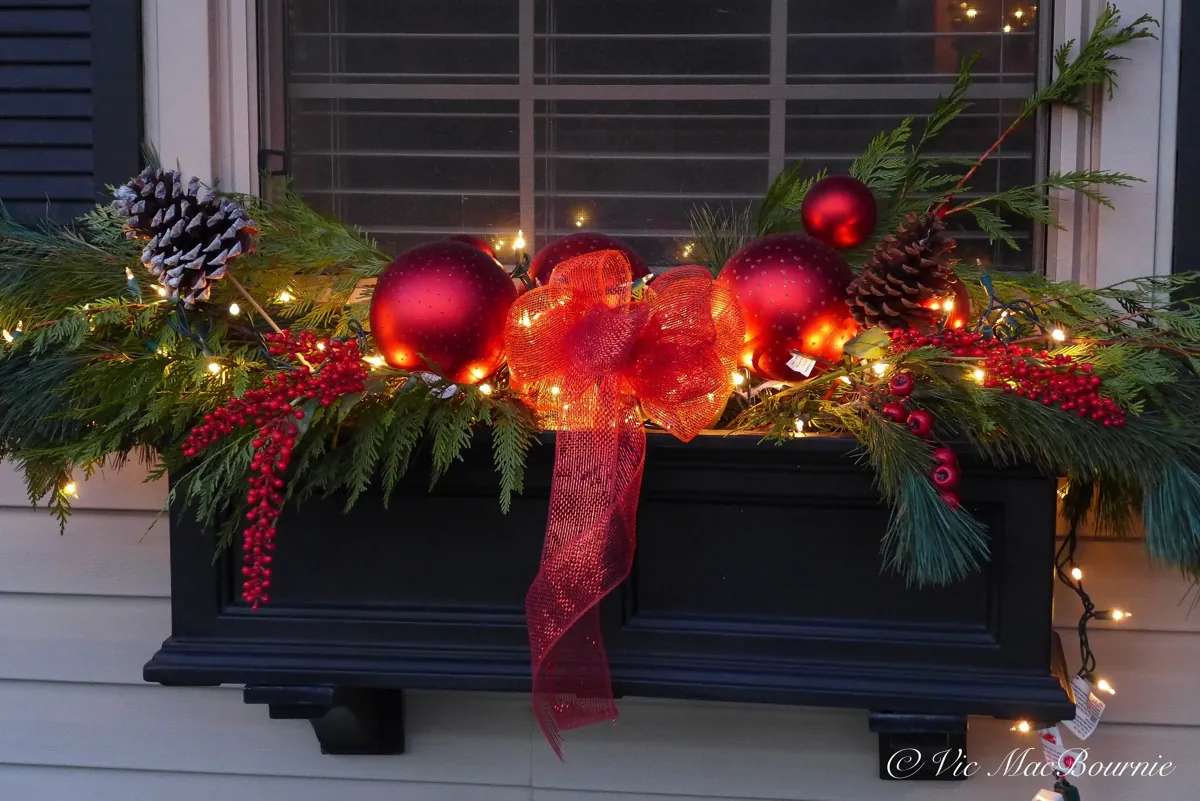
Vic’s black window box uses a red mesh bow and a cluster of large red ornaments as the focal point. Pinecones and mixed greenery surround them, with warm-white lights tucked through the base. The large shapes are easy to read without covering every inch in small decorations.
Use the look, not an assumed material: Choose outdoor-rated, shatter-resistant ornaments and secure each one; the photograph alone does not establish what its ornaments are made from. Keep glass and loose heavy objects out of an elevated box. Add one bow, then run an appropriate light set through the greenery with its controls and connections accessible.
Weather limit: Follow the whole lighting system’s exposure instructions, not just the bulbs’ label. Secure trailing cable without piercing it, shorten ribbon tails where wind is strong, and turn the system off for adjustments. Without a suitable exterior power setup, the same red-and-black composition works unlit.
8. A Brown Willow Wreath + a Low Band of Lights
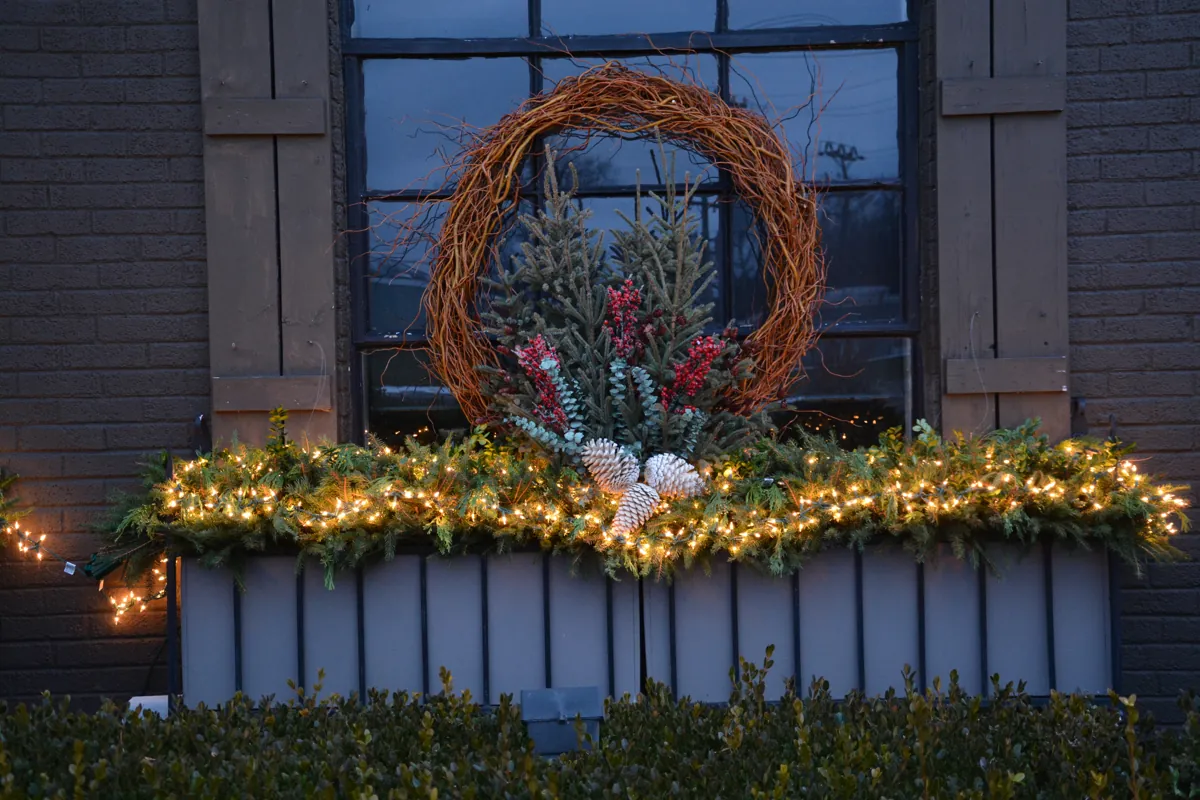
Deborah Silver’s shop window box puts a large brown willow wreath behind a low sweep of greenery and lights. The circular texture reads clearly against the blue-trimmed windows, while the light stays concentrated near the base. Its scale belongs to a professional storefront installation.
Make it yours: Keep the idea of one textured circle and a lower horizontal layer, not the original commercial dimensions. Try a paper outline against your window before choosing an appropriately sized, exterior-suitable wreath. Give it a proper fixing rather than asking foliage or loose stems to hold it upright.
Exposure and cost: A projecting wreath can catch wind and collect snow, so use this only where the support and site suit it. An unlit version avoids the electrical equipment, not the need for structural support. Reuse a suitable wreath and buy only enough greenery to complete the lower line.
9. Looping Twig Garland + White Berry Picks
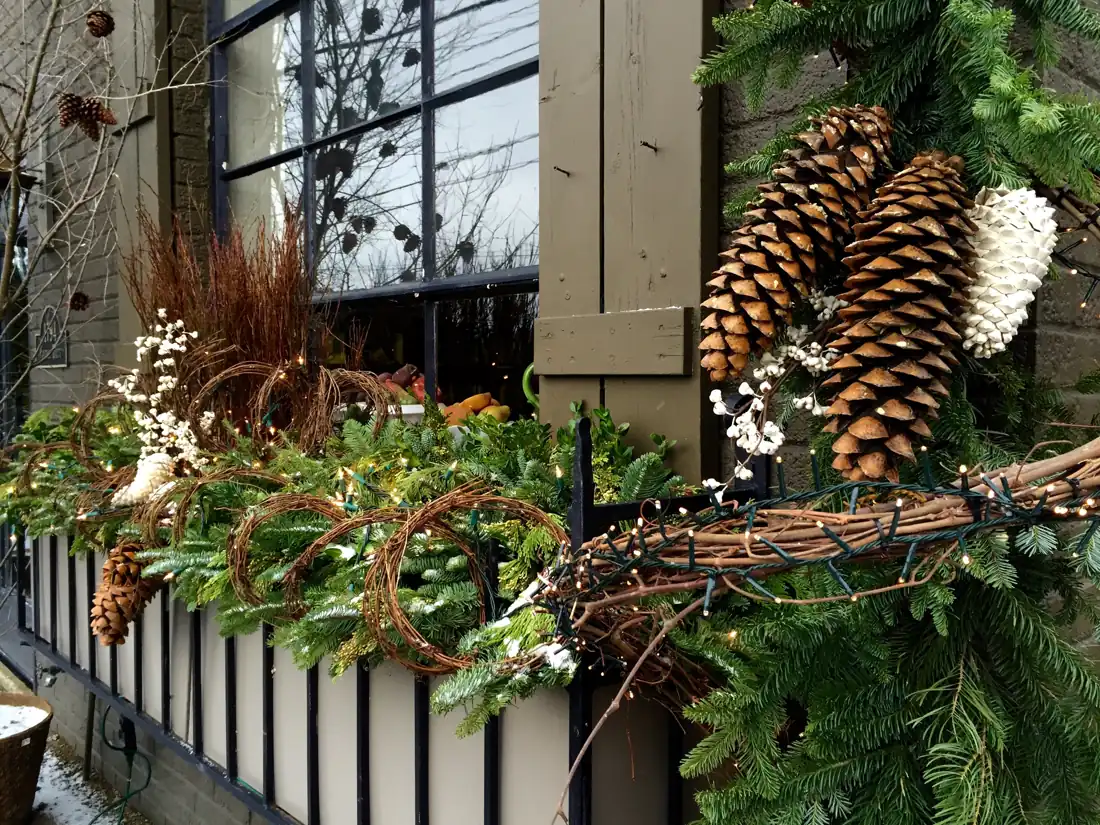
Another Deborah Silver installation uses looping brown vine garland along the front of a green-filled window box. White berry picks and pinecones punctuate the darker textures, creating a more sculptural line than a soft ribbon. The maker explicitly identifies the white berry picks as artificial.
Small-box adaptation: Repeat a few short vine loops and smaller cones instead of copying the oversized accents in the professional scene. Attach the garland and cones to suitable support points, keeping weight and projections within the actual installation’s limits. Use outdoor-rated white picks; indoor floral stems are not a substitute just because their color matches.
Wet-weather note: Check coatings, ties, and contact points after rain, and keep dripping or staining materials clear of vulnerable surfaces. Avoid long dangling cone strands where they can swing or fall. The brown-and-white palette gives contrast without edible fruit, glass icicles, or added artificial snow.
10. Red Cyclamen + Silver-Green Foliage in a Sheltered Box
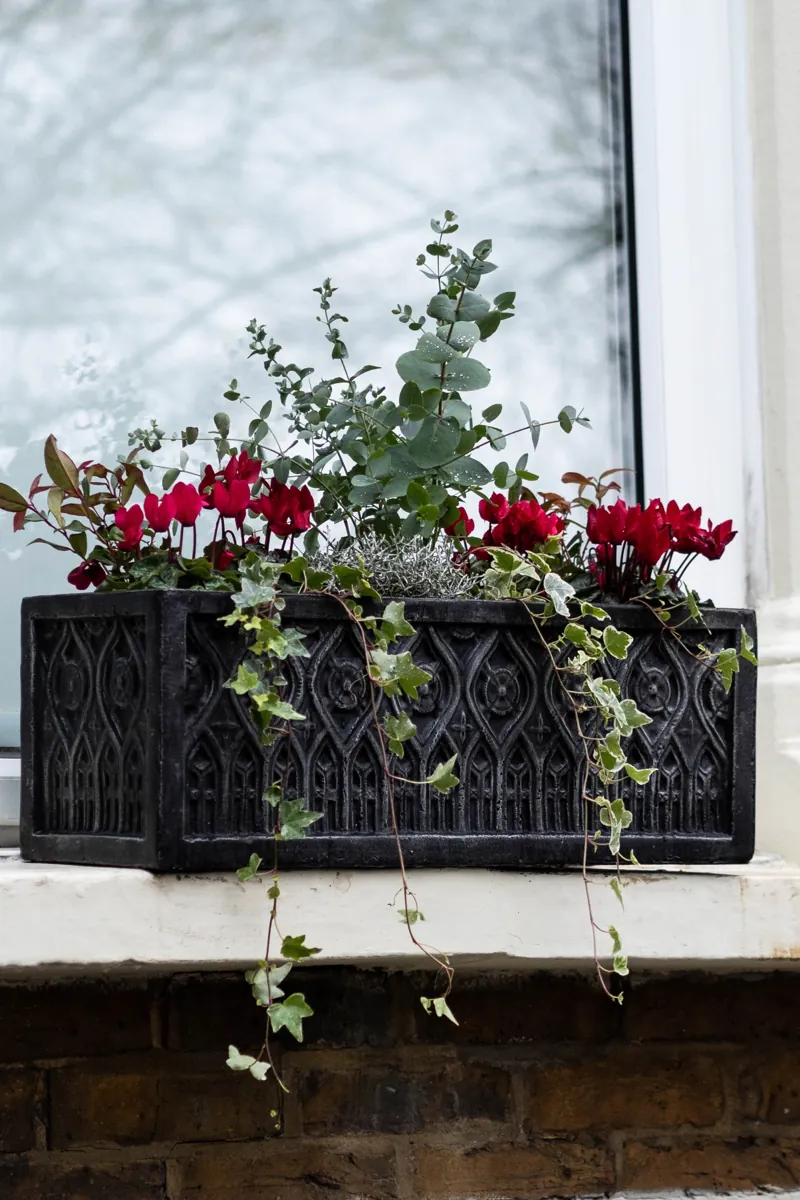
Jane Beedle’s planting, documented by Alexandra Campbell, combines red cyclamen with upright gray-green foliage and trailing ivy in a decorative black box. Unlike most examples here, this is a living planting. Its red, silver, and green palette feels Christmassy without needing ornaments.
Climate comes first: Treat this UK project as inspiration for a sheltered seasonal planting, not a guarantee for freezing winters elsewhere. The source identifies eucalyptus, cyclamen, ivy, barbed-wire plant, and Leucothoe in the project, but the photograph does not establish every cultivar’s hardiness. Confirm species, cultivar, light needs, and container suitability with a local nursery before buying. If they do not suit your winter, use one of the cut-branch ideas instead.
Care and budget: Keep drainage open and check moisture during mild spells; do not water by a fixed holiday schedule. RHS winter-container guidance stresses appropriate containers and checking compost, while Illinois Extension notes roots are more cold-sensitive than stems. The original maker planned to replace the cyclamen around January, so budget for a seasonal flower change, not guaranteed blooms until spring.
Choose one palette and one focal shape, then let the window, box, and weather set the limits. A smaller, well-secured arrangement is more useful than a crowded display you cannot safely maintain.